|
Goodmans GDB2 Update software
This page is intended to explain how
to update the firmware of the Goodmans GDB 2 digital television set top
box to the latest version, including the 7 day EPG...
I provide this service with
no guarantees, every effort has been made to ensure that the
information is correct but you perform this entirely at your own risk.
What you need
Downloading the firmware
The procedure
Setting Up
The transfer
What if it all goes wrong - returning the box to normal
What you need.
- You will need the firmware
- A Goodmans GDB2 DTT
- A Computer with hyper terminal installed
- An RS232 cable
An RS232 serial cable is the old Atari TM
style 9-pin joystick port. You will be able to purchase this from any
well known electronics store for a couple of pounds. The point being
that it is much cheaper than posting the box back to Goodmans.
Check when purchasing the lead that both end of the cable are the right way round for your box and computer, normally Male Male.
Picture of an RS232 lead.
The hyper terminal is not always installed by default with your computer, if it is it will be under
Start - Programs - Accessories - Communications.
If you do not have the Hyper terminal installed go to control panel -
Add.Remove programs - Windows Setup and install it. You may need your
windows disk.
Downloading the firmware
Version 4.1 is the latest version of the firmware for the GDB2 and
includes the 7 day EPG update, I may make other versions available as
and when i get them.
Right click the file, chose 'Save As...' and save the file to somewhere you will remember.
If you downloaded the zip file the be sure to unzip it.
The procedure
Setting Up
- Attach the RS232 to the port on the
back of the computer and digi box. The key to doing this is simply that
the place where it goes.
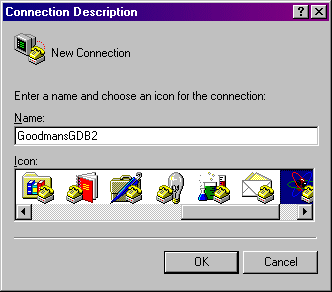
- Open the hyper terminal from (usually accessories - communications)
- Enter
a name for the connection that you will remember and chose an icon. We
are going to save the settings so they can be used again....
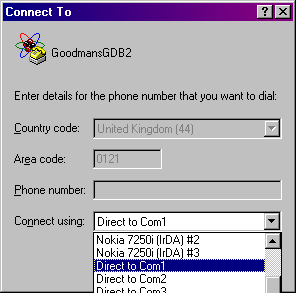
- In the next dialogue enter the port on
which you are connected to the box, COM1 or COM2. If you are not sure
then it will probably become apparent later. You will be able to change
this. Or just start again. Press OK and move to the next screen.
- The next dialogue controls the options relating to how the two devices will communicate:
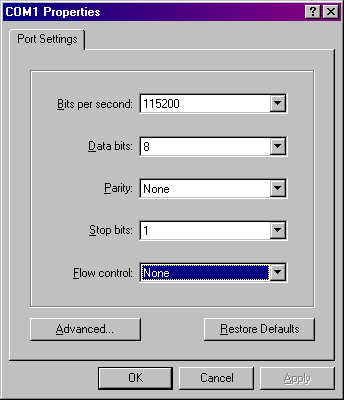
Make sure the settings are exactly as in the picture. That is:
- Bits per second - 115200
- Data bits - 8
- Parity - None
- Stop bits - 1
- Flow control - None
Press OK and move on to the next screen.
At this stage if you were to quit you could save the session and start
again by clicking on the the icon you have created in the Hyper
Terminal directory.
The two devices are now ready to talk to each other.
The transfer
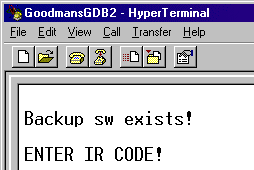
- To initiate the communication press the 'Reset button' on the rear panel of the digi box....
The existence of the new connection will be indicated by the Hyper Terminal window displaying the following...
- From the transfer menu chose 'Send File...'
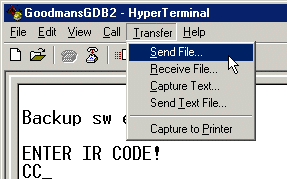
In the next dialogue browse to the location you saved or uncompressed the bin file to.

Then from the drop down select 1K Xmodem
Press 'Send'.
- The transfer dialogue will then appear. At this point nothing will be happening.....
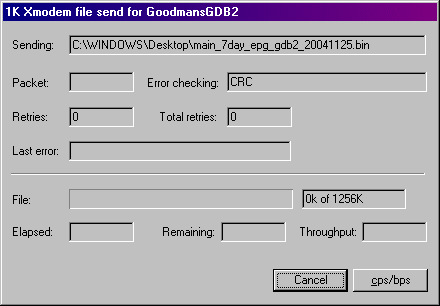
To begin the transfer press the reset button again on the back of the digi box.
The file will now begin to transfer. The whole process will probably take around 2 to 3 minutes.
At this stage, if the transfer is holted or appears to not have started
you should go back to stage 6. You are relatively safe as whilst the
firmware you are updating includes the part of the program that allows
it to be updated, the box will not overwrite its existing firmware
until it has unpacked and checked the integrity of the update.
- When the transfer has completed the Hyper Terminal will display :
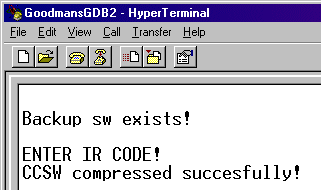
The box has now been updated and is almost ready to use. The box must
be left for 20-30 seconds to initialise. then after one reset or power
down, the process has been completed.
- Connect the Box to a TV and press the
Menu button - select configuration, and check that the box is
displaying the correct version of the firmware.
|